
托管教程
寻找结果为:
在本指南中,您将学习如何使用Apache设置内部DNS并进行绑定。 这将允许您配置私有名称服务器并将域连接到服务器,而无需使用控制面板。 您将需要通过SSH或其他方法(例如VNC)连接到服务器。 有关如何通过SSH连接到服务器的更多信息,请查看 通过SSH连接到服务器.
要运行bind并继续阅读本指南,您需要具有 灯 堆栈安装在Hostwinds服务器上。
配置您的DNS
步骤1。 您需要安装Bind9软件包。 您可以通过运行来执行此操作。
apt-get install -y bind9 bind9utils bind9-doc dnsutils
第2步。 安装后,您需要编辑您的命名。 conf.Options文件,您可以通过运行Nano或您喜欢的文本编辑器来执行此操作。
nano /etc/bind/named.conf.options
如果有两个IPv4地址,您需要将IP地址添加为"转发器",您可以使用这些,或者您可以使用主IPv4和IPv6。您还需要添加侦听{localhost;104.xxx.xxx.xx;};使用您的主要IP。您可以在下面看到一个例子。
options {
directory "/var/cache/bind";
// If there is a firewall between you and nameservers you want
// to talk to, you may need to fix the firewall to allow multiple
// ports to talk. See http://www.kb.cert.org/vuls/id/800113
// If your ISP provided one or more IP addresses for stable
// nameservers, you probably want to use them as forwarders.
// Uncomment the following block and insert the addresses replacing
// the all-0's placeholder.
listen-on { localhost; 104.XXX.XXX.XX; };
forwarders {
104.XXX.XXX.XX;
2607:XXXX:XXXX:XXX::X;
};
//========================================================================
// If BIND logs error messages about the root key being expired,
// you will need to update your keys. See https://www.isc.org/bind-keys
//========================================================================
dnssec-validation auto;
auth-nxdomain no; # conform to RFC1035
listen-on-v6 { any; };
};
第三步 您将需要使用文本编辑器在named.conf.default-zones中添加DNS区域:
nano /etc/bind/named.conf.default-zones
您需要添加两个区域。 第一个将为您的域名example.com。 第二个是您的反向DNS,104.xxx.xx.in-addr.arpa
zone "example.com" {
type master;
file "/etc/bind/db.example.com";
allow-update { none; };
};
zone "104.XXX.XXX.in-addr.arpa" {
type master;
file "/etc/bind/db.104";
allow-update { none; };
};
步骤4。 您需要创建刚刚调用的实际区域文件,因此让我们使用nano编辑这个db.example.com文件
nano /etc/bind/db.example.com
该文件应如下所示,用所需的域名替换example.com,并用服务器提供的IP地址替换IP地址
$TTL 604800
@ IN SOA ns.example.com. root.example.com. (
2; Serial
604800; Refresh
86400; Retry
2419200; Expire
604800 ); Negative Cache TTL
;
@ IN NS ns1.example.com.
ns1 IN A 104.XXX.XXX.XX
@ IN NS ns2.example.com.
ns2 IN AAAA 2607:XXXX:XXXX:XXX::X
@ IN A 104.XXX.XXX.XX
www IN CNAME example.com
您还必须为您的反向DNS创建一个区域文件,同样地制作上面的db.example.com。 但是,该文件应该如下所示
$TTL 604800
@ IN SOA ns1.example.com. root.example.com. (
2; Serial
604800; Refresh
86400; Retry
2419200; Expire
604800 ); Negative Cache TTL
;
@ IN NS ns1.example.com.
5 IN PTR ns1.example.com.
@ IN NS ns2.example.com.
10 IN PTR ns2.example.com.
每次更新这些文件时,您都必须增加序列号。 如果您还肯定要使用实际域名替换example.com,最好是。
第五步 您可以通过运行以下命令来检查配置和区域
named-check conf
named-checkzone example.com db.example.com
named-checkzone 104.XXX.XXX.in-addr.ARPA /etc/bind/db.104
如果配置好,姓名 - 检查会将返回任何内容。
如果区域很好,则命名后检查区域将返回类似于以下内容的输出:
区域example.com/IN:已加载序列号10
好
第六步 一旦所有配置和区域都会退出,您需要重新启动并启用Bind9
systemctl restart bind9
systemctl enable bind9
步骤7 最后,您需要告诉服务器检查名称。 Conf。 您可以通过编辑/ etc / default / bind9文件来检查名称来执行此操作。 conf
nano /etc/default/bind9
该文件应该如下所示:
OPTIONS="-u bind -c /etc/bind/named.conf"
步骤8 检查bind9状态是否有其他错误
systemctl status bind9.service
如果应如下所示:
bind8.service - Berkeley Internet Name Domain (DNS)
Loaded: loaded (/usr/lib/systemd/system/bind9.service; enabled; vendor preset: disabled)
Active: active (running) since Thu 2018-11-15 21:57:23 UTC; 18h ago
Main PID: 23785 (named)
CGroup: /systemd/bind9.service
└─23785 /etc/default/bind9 -u bind -c /etc/bind/named.conf
Nov 15 21:57:23 xxxxxxxxxxxx.hostwindsdns.com bind[23785]: command channel listening o...3
Nov 15 21:57:23 xxxxxxxxxxxx.hostwindsdns.com systemd[1]: Started Berkeley Internet Nam....
Nov 15 21:57:23 xxxxxxxxxxxx.hostwindsdns.com bind[23785]: command channel listening o...3
Nov 15 21:57:23 xxxxxxxxxxxx.hostwindsdns.com bind[23785]: managed-keys-zone: loaded s...1
Nov 15 21:57:23 xxxxxxxxxxxx.hostwindsdns.com bind[23785]: zone example.com/IN: lo...0
Nov 15 21:57:23 xxxxxxxxxxxx.hostwindsdns.com bind[23785]: zone 104.xxx.xxx.in-addr.ar...0
Nov 15 21:57:23 xxxxxxxxxxxx.hostwindsdns.com bind[23785]: all zones loaded
Nov 15 21:57:23 xxxxxxxxxxxx.hostwindsdns.com bind[23785]: running
Nov 15 21:57:23 xxxxxxxxxxxx.hostwindsdns.com bind[23785]: zone example.com/IN: se...)
Nov 15 21:57:23 xxxxxxxxxxxx.hostwindsdns.com bind[23785]: zone 104.xxx.xxx.in-addr.ar...)
设置胶水记录
要完成制作您的名称服务器,您需要转到您的域名注册商并在您的名称服务器上设置"粘合记录"。这是将名称服务器记录连接到名称服务器的IP的位置。以下是在Hostwind上注册的域的示例,以帮助您通过遵循本指南中的示例来帮助您设置。
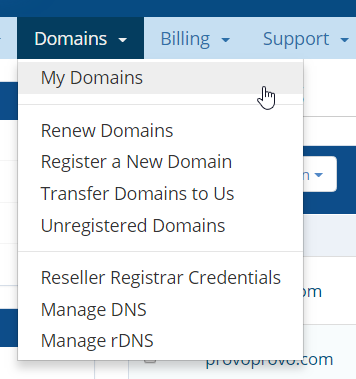
步骤1。 在您的客户区中,选择 域 下拉菜单并选择 我的网域 从下拉下来
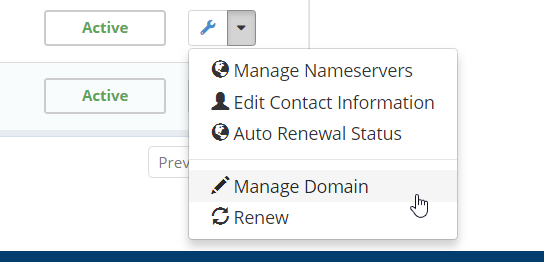
第2步。 选择扳手图标旁边的下拉,然后选择 管理域名。
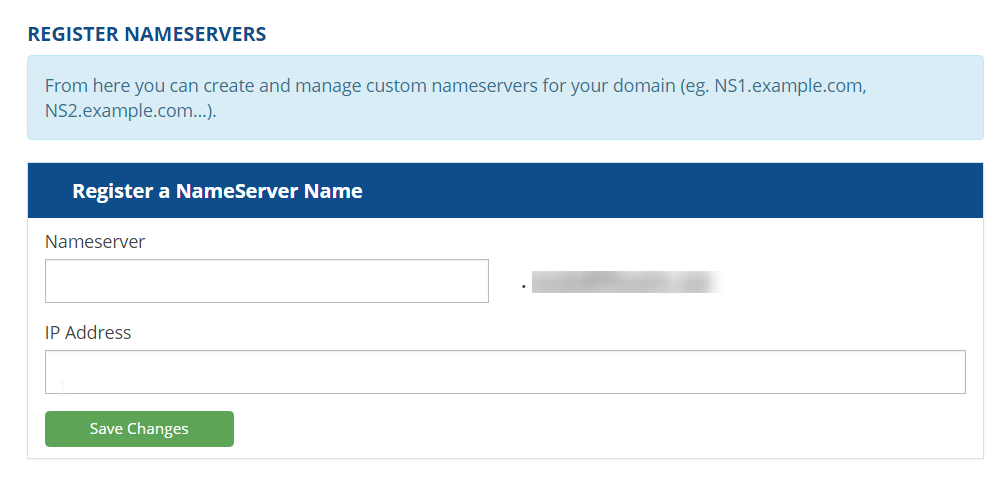
第三步 在左侧 管理 盒子,选择_私人名称服务器_'

步骤4。 以下是输入ns1.example.com和ns2.example.com及其关联的IP的位置
测试您的域
一旦上述所有步骤都完成,您应该准备好! 要测试您的域,您可以使用像whatsmydns.com或使用ssh的挖掘命令使用网站。
dig example.com ns
The output of this command should look like this:
; <<>> DiG 9.9.4-RedHat-9.9.4-61.el7_5.1 <<>> example.com ns
;; global options: +cmd
;; Got answer:
;; ->>HEADER<<- opcode: QUERY, status: NOERROR, id: 45516
;; flags: qr rd ra; QUERY: 1, ANSWER: 2, AUTHORITY: 0, ADDITIONAL: 1
;; OPT PSEUDOSECTION:
; EDNS: version: 0, flags:; udp: 4096
;; QUESTION SECTION:
;example.com. IN NS
;; ANSWER SECTION:
example.com. 86400 IN NS ns1.example.com.
example.com. 86400 IN NS ns2.examplecom.
;; Query time: 2 msec
;; SERVER: 104.xxx.xxx.xx#53(104.xxx.xxx.xx)
;; MSG SIZE rcvd: 80
添加另一个域
要添加另一个域,您需要添加另一个区域文件。
这是我们的其他db.domain.com区域文件的区域文件的外观示例
$TTL 604800
@ IN SOA ns.example.com. root.example.com. (
2; Serial
604800; Refresh
86400; Retry
2419200; Expire
604800 ); Negative Cache TTL
;
@ IN NS ns1.example.com.
ns1 IN A 104.XXX.XXX.XX
@ IN NS ns2.example.com.
ns2 IN AAAA 2607:XXXX:XXXX:XXX::X
@ IN A 104.XXX.XXX.XX
www IN CNAME domain.com
撰写者 Hostwinds Team / 十一月 17, 2018